Add Additive or Non-Additive Metrics
You can add additive or non-additive metrics to a model by selecting a column in the fact dataset, as well as a supported aggregate calculation to apply to the data in that column.
Before you start
If you use Databricks SQL as a data warehouse, you can use the databricks.estimateddistinctcount.deviation global setting to specify the maximum relative standard deviation allowed for the approx_count_distinct aggregate function. The default value is 0.02.
Procedure
To add an additive or non-additive metric:
-
In the Workspace panel, click the new object button and select Metric.yml. The Metric properties panel opens.
-
Complete the following fields:
- Display name: The name of the metric that appears in BI tools.
- Unique name: The unique name of the metric. This value must be unique across all repositories and subrepositories.
- Description: Optional. A description of the metric.
- Dataset: The dataset that contains the source column you want to base the metric on. This should be the model's fact dataset.
- Target column: The dataset column the metric is based on.
-
In the Aggregation type field, select the aggregate calculation to apply to the data.
Type of Metric Supported Aggregation Types Additive Average, Distinct Count Estimate, Max, Min, Non-distinct Count: count non-null, Population Standard Deviation: stddev_pop, Population Variance: var_pop, Sample Standard Deviation: stddev_samp, Sample Variance: var_samp, Sum Non-Additive Distinct Count, Distinct Sum, Percentile, Count If -
If you selected an Aggregation type of Percentile, complete the following fields:
- Quality: Select an estimation quality for your quantiles. If you select Custom, you must also specify an integer value for the quality.
- Percentile: Select the quantiles you want your data to be divided into. If you select Custom, specify the values you want to use. You can add more values by clicking the + icon below the Add Value field.
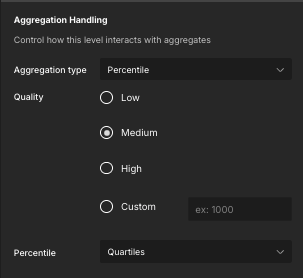
For more information on qualities and percentiles, see Non-Additive Metrics.
-
In the Data Handling and Formatting section, enter the following details:
- Override Default Handling: For information about this field, see About Queries on Dimensions that are Unrelated to One or More Queried Measures.
- Formatting: Select the format for the values. If you select Custom, you must enter a custom data format. For more information, see Formats for Data Values.
-
In the Visibility in Published Data Sources section, enable/disable the Include in the list of available metrics option. When enabled, the metric appears in deployed versions of the model.
-
Click Apply.
The new metric appears in the metrics/ folder of the Workspace panel.
If you want to specify a folder for the metric for organizational purposes, you must do so from the Model properties panel.