Allowing Tableau Server to Impersonate Users
Tableau workbooks that are published from Tableau Desktop to Tableau Server can be viewed in a browser by people who are granted permission to do so. This permission is either granted by the Tableau user who publishes a workbook or by a Tableau administrator after a workbook is published. You can configure AtScale to allow users with this Tableau permission to view in a browser workbooks that are based on data sources that are published from AtScale.
Before you begin
-
You must be using Microsoft Active Directory to manage AtScale users.
-
The data warehouse must support Kerberos and AtScale must be configured to connect to it through Kerberos. For details, see Configuring Kerberos.
-
People whom you want to be able to view a workbook that you publish to Tableau Server must have runtime permissions on the object that the workbook is based on.
- If the object is a published AtScale cube, see either Granting Runtime Permissions on Cubes to Groups of Locally-Authenticated Users.
- If the object is a published perspective of an AtScale cube, see Granting Runtime Permissions on Perspectives.
About this task
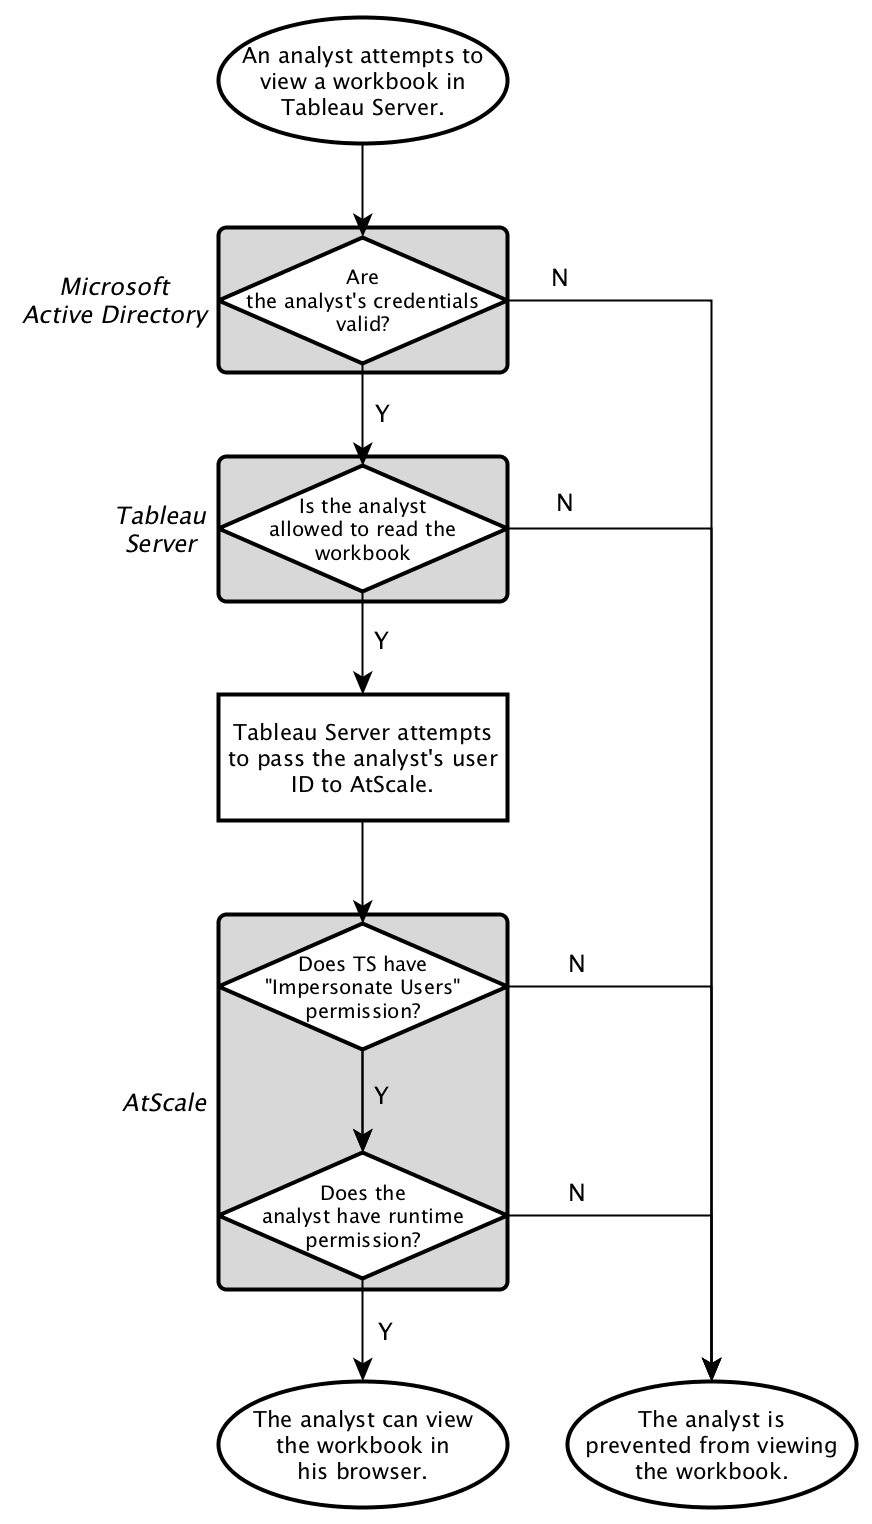
Suppose that someone creates a workbook that is based on a published AtScale cube. In Tableau, that person publishes the workbook to Tableau Server, specifying that the user analyst can view the workbook in a browser by opening the workbook after logging into Tableau Server, as exemplified in this diagram:
Figure 1. How Tableau Server impersonation works with AtScale

When the analyst attempts to view the workbook, Microsoft Active Directory checks whether the account being used is in the correct Windows domain and whether the account credentials are valid. Then, Tableau Server verifies whether the user ID associated with the account is allowed to read the workbook. If the user ID is allowed to do that, Tableau Server passes the user ID to AtScale. AtScale checks whether Tableau Server has permission to impersonate users. If Tableau Server has this permission, then AtScale checks whether the user ID has runtime permission on the cube that is the data source for the workbook. If the analyst does have this permission, then the analyst is able to view the workbook.
Procedure
- Create an account in Microsoft Active Directory for Tableau Server to use to connect to AtScale. Configure Tableau Server's Run As User account to use the account that you created. For the steps, see Create and Update the Run As User Account in the documentation for Tableau.
Note: The Windows domain in which you create the account must be the same Windows domain for the accounts of the AtScale users who will publish workbooks to Tableau Server and for the AtScale users who will view those published workbooks.
Note: Starting in AtScale 2019.2.0, Tableau Server Impersonation
relies on a new setting, PROXY USER ATTRIBUTE, for LDAP directories. The
PROXY USER ATTRIBUTE is configured in AtScale from the Security >
Directory > Setup > Custom Directory: User Schema Settings dialog.
This setting identifies what user attribute is being passed in by
Tableau Server as the proxy user, and the AtScale engine uses this
setting to look up the user in the user directory and find its USER
UNIQUE ID ATTRIBUTE. Until AtScale 2019.1.0, Tableau Server
Impersonation was only supported with the USER UNIQUE ID ATTRIBUTE set
to userPrincipalName. AtScale now supports Tableau Server
Impersonation with the USER UNIQUE ID ATTRIBUTE set to both
userPrincipalName or sAMAccountName.
-
Configure the Tableau Server Application Manager to use the credentials for the account that you created in step 1 for Tableau Server. The Tableau Server Application Manager is a service that runs on the Windows system where Tableau Server is installed. Follow these steps to specify the credentials:
- Right-click the Windows icon in the task bar and select Control Panel.
- Select System and Security, and then select Administrative Tools.
- Double-click Services.
- Double-click Tableau Server Application Manager.
- Click the Log On tab.
- Select This account.
- Specify the Windows domain and the username for the Tableau Server user.
- Specify the password for the Tableau Server user.
-
In AtScale, create a role that has only the Impersonate Users permission. See Creating and Editing Roles.
-
If you placed the Tableau Server user ID into a group, follow these steps in AtScale:
- Assign the role to the directory group that you created for the Tableau Server user ID. See Assigning Roles to Directory Groups.
- Log into AtScale with the Tableau Server user ID to import that user ID into AtScale.
-
If you did not place the Tableau Server user ID into a group, follow these steps in AtScale:
-
Create a new filter that queries only the Tableau Server user ID and click the Play button for the filter.
You can do so in the Synchronize Directory section of the overview page for your AtScale organization.
- Assign the new role to the Tableau Server user ID. You can do this in the Role Assignments section of the overview page for your AtScale organization.
-